Having just returned from my summer vacation, I am mindful that the cricket playing season is coming to a close with many groundsmen turning their attentions to their end of season renovations. These start for some schools groundsmen in August, whereas most grassroots cricket clubs do not start their renovations until late September, early October.
It is important you prepare and plan your renovations early enough to ensure you are not left short of materials or a contractor cannot fit you in, during this busy time of the year.
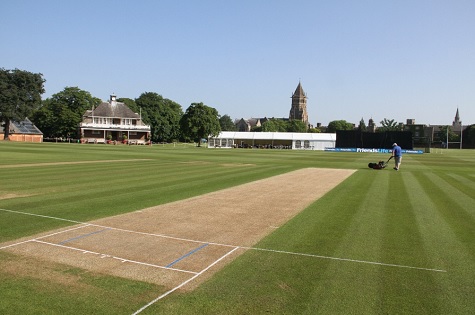
My key message is to undertake an effective renovation programme at the end of the playing season to repair ends, restore levels and introduce some new grass seed into the square.
As most top professionals would say, skimp at your own peril, because if you do not carry out the appropriate level of work on your square it can lead to the production of inferior pitches the following season.
Again, the effectiveness of these renovations will be determined by the knowledge and resources available and no doubt governed by the current weather conditions to some degree. Aeration work may be a problem while the grounds remains dry and hard.
Also, if these conditions persist, you will need to keep any newly sown squares watered.
Renovating a square is hard work, often made harder if you do not have the appropriate machinery and personnel to undertake the work. There are some very good local contractors who are professionally geared up to undertake this work. It might be worthwhile obtaining a quote?
A visual examination of the surface is simply not good enough. Taking a number of core samples allows you to see the amount of thatch, root density and integrity of the soil, in terms of having any root breaks or changes of soil physical properties. Ideally you should be taking core samples to a depth between 100mm-150mm.
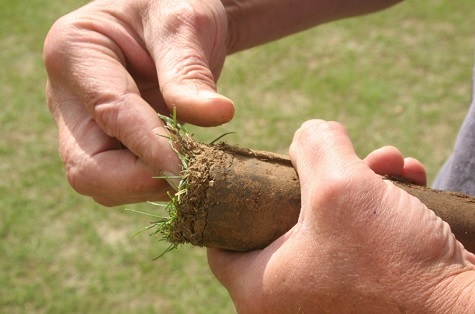
Also, the benefit of taking soil samples is you can send them off for a soil particle size analysis and nutrient status, thus giving you more information about your square.
It is important to order any materials in advance of the renovations. Seed and loam supplies can be delayed, get your order in early.
There are some very basic aims when renovating a cricket square and these hold true no matter where the square, the standard of cricket played on it or the resources available.
The first job is to clean off as much vegetation as possible and remove any unwanted organic matter / thatch by the process of mowing, scratching, scarifying and sweeping the surface prior to topdressing.
You really need to remove as much dead matter and thatch out of your square as possible, scarifying in several directions. Too often I see clubs not cleaning enough material off.
Then re-instate damaged areas (bowlers ends and batting creases) and restore levels with appropriate amounts of compatible loam material and then overseed with a desirable dwarf ryegrass seed mixture.
Thatch is a tightly intermingled layer of living and dead stems, leaves and roots, which accumulates between the layer of actively growing grass and the soil underneath. Thatch accumulates when the production of dead organic matter exceeds the rate at which it decomposes or when topdressing over excessive levels of thatch leads to buried thatch and fibrous profile that will inevitably lead to low and slow pitches.
All clubs will have their own methods of working and renovating their squares. The first task is to mow the square as low has you can get with your wicket mower, then use a combi rake to scratch up any remaining prone grass growth and then re-mow the square or use a brush / vac to clean up the surface.
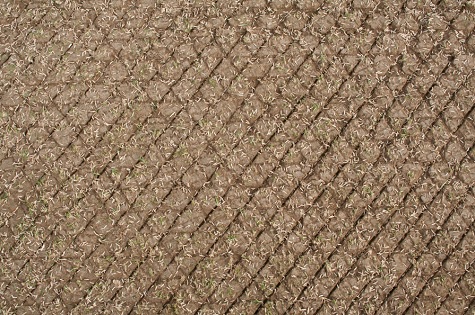
The next task is to scarify the square. Scarifying is a process perhaps best described as a mechanical raking and is usually only carried out during end of season renovations or once a wicket is finished with for the year. Although its primary purpose is to remove thatch, it has associated benefits as well (linear aeration). A scarifier uses a series of sharp blades that rotate at high speed and cut into the turf in a vertical manner. Always scarify to a depth suitable to your square - i.e. to below the depth of thatch.
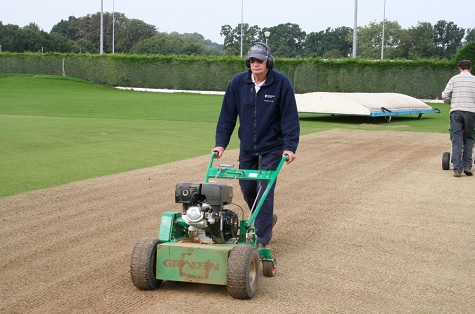
Scarification is important to remove unwanted vegetation, but also to produce a key for the new loam material and seed to sit in. The level of scarification required will be dependent on how much of a thatch layer you have generated throughout the season. scarifying in at least three directions, finishing in the line of play. Never scarify at right angles to the last pass as this can pull blocks up and severely disrupt the surface.
Where necessary, clean off all the thatch debris after each pass. The square can then be oversown using a suitable grass seed mixture; do not be frightened to try out new cultivars. Sowing rates now range between 35-50 grammes per square metre. In essence you are aiming to establish new grasses into your square.
In recent years we have seen a better choice of machinery to undertake this work in the form of dedicated tractor mounted / pedestrian scarifiers - ones such as the Sisis TM 1000 and HD 600, the powerful Graden scarifiers and Koro Frasie mowers.
The final task is to apply some new compatible loam material to repair your ends and restore general levels. It is important to stick with the same type loam material, never a good idea to mix your loams, as they have different shrink and swelling characteristics.
There are a number of specialist loam suppliers that can supply specific clay content loam soils, you need to ensure the material is compatible to your existing loam soil material.
Your loam can be applied in various ways, some groundsmen still apply and spread by hand, most clubs will use a drop / cyclone type of spreader. As a guide, most club groundsmen tend to use between 6-10 22kg bags per pitch, the key is not to smother the turf and spread it on evenly.
Once you have topdressed the square, it then a case of using a trulute / straight edge / brush to work in the loam material into the surface and cover the seed.
Ensure a good seed pattern during renovations. The best method is to use a dimple seeder and make many passes but, if this is not possible, use scarifier grooves, even applying seed in between scarifier passes whilst the slits are open, since only a small proportion of the seed will be picked up in subsequent passes. The seed must be in good contact with the soil or it will not grow.
Aim to complete all renovations by the end of October at the absolute latest, preferably sooner. Ryegrass needs a soil temperature of above 5.5° C in order to germinate. With favourable temperatures, the seed should germinate between 7 and 14 days. Water the seed if necessary and keep moist until the grass plants have established.
A pre-seeding fertiliser can be used to help promote some growth, something like an 8:12:8 or even a 7:7:7 at 35g/m2 will be ideal, though you should be careful not to use anything with iron in at this stage as it can acidify the surface and damage the new grassplants. It will then be a case of allowing it to grow to a height of around 40mm before giving its first cut using a rotary mower.
Regular mowing when the grass is growing will maintain the sward health. Certainly, do not allow the sward to grow above 25mm when established or else there will be a loss in density.
Feed through the winter months too! Grass needs much less nitrogen through the winter months, but that does not mean that it needs none. Applying a low nitrogen feed, which is high in potassium, will help the grass plant recover from damage and stress and keep red thread at bay.
One of the last beneficial jobs, is to carry out some aeration work, usually done in October / November when soil conditions allow. In recent years we have seen a move to some deeper aeration techniques pioneered by Bretton King from Ecosol with his deep drilling machine and Keith Exton who developed the use of a Weidemann fast tinning machine, both able to aerate to depths of 200mm with 8-10mm diameter tines. Most clubs, however, use a pedestrian solid tine aerator spiking down to a depth of 100mm.

